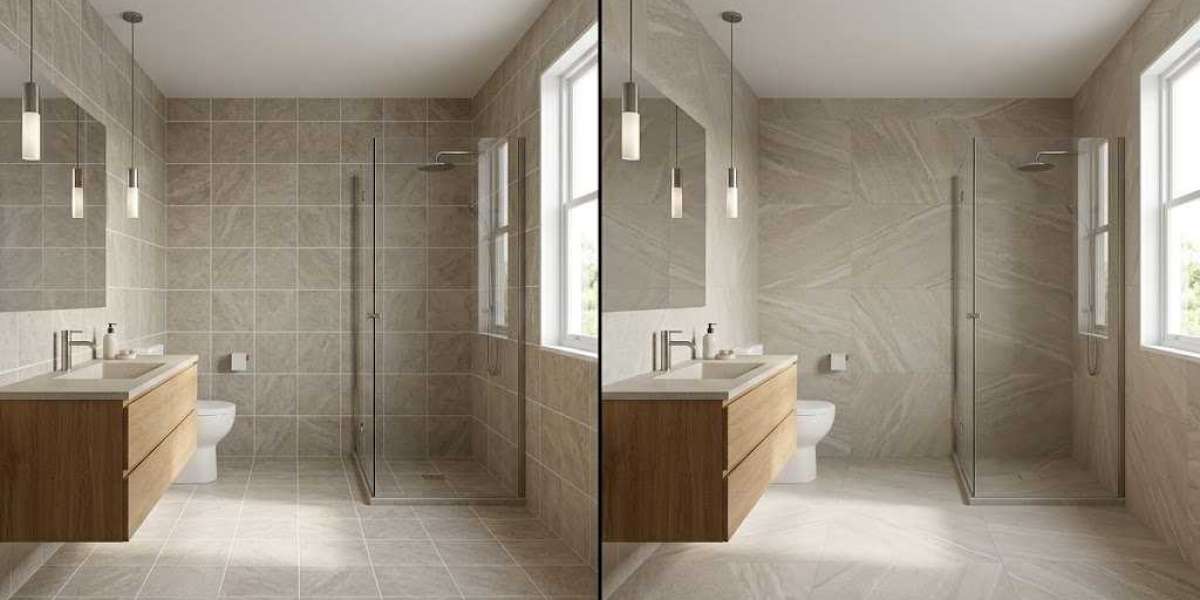

Tile has a way of defining a room. It sets the tone underfoot and anchors the entire visual scheme. Walk into any tile retailer and the options stretch from tiny mosaics to massive porcelain panels that barely fit through a doorway. But before you fall for a color or texture, there is a more fundamental decision waiting — and it comes down to dimensions.
The size you choose influences nearly every aspect of the project. It affects how much you spend, how long the job takes, and how the finished surface performs over years of daily use. Both standard and oversized formats have legitimate strengths. Knowing where each one excels will keep you from regretting your choice after the last tile is set.
What Counts as Standard vs. Oversized?
The industry draws a clear line between these two groups. Standard tiles include common squares like 12x12, 8x8, and 6x6 inches. Smaller rectangular formats such as 3x6 also fall within this familiar category.
Once a tile exceeds 15 inches on any edge, it enters oversized territory. That range covers popular formats like 18x18, 24x24, and plank-style pieces measuring 12x24 or 8x48. On the far end, some manufacturers produce enormous thin porcelain slabs several feet wide. Products starting at 18 inches and above are typically classified as large format tiles, and they have moved from niche to mainstream in recent building projects.
The size distinction matters for reasons that go well beyond appearance. Installation methods, substrate requirements, and tool needs all shift as tile dimensions increase. Understanding these shifts before you shop keeps expectations realistic.
The Enduring Strengths of Standard Formats
Standard tiles have been the default residential choice for decades, and that consistency rests on solid practical foundations.
Handling and transport are effortless. A single 12x12 tile weighs little, fits one hand, and positions quickly against chalk lines or spacers. Cutting around plumbing, vent openings, and curved walls demands only modest tools and basic technique. Offcuts are small enough to reuse in gaps, which keeps material waste low throughout the project.
Tooling costs remain minimal. A manual snap cutter handles most cuts cleanly, and even a low-cost wet saw performs well on these dimensions. No specialty blades or heavy-duty mixing equipment is required. This accessibility makes standard formats a natural starting point for anyone learning tile installation for the first time.
Compact rooms with many fixtures benefit directly from smaller dimensions. Consider a half-bath where the toilet flange, vanity base, and doorway frame leave only slivers of open floor. Smaller tiles conform to that geometry without generating an excessive number of difficult cuts. The layout moves quickly, and frustration stays contained.
The compromise is grout density. More tiles per square foot means more joints, and those joints form a prominent grid across the surface. In tight quarters, that network of lines can look fragmented and visually restless. Grout also attracts dirt gradually and requires periodic scrubbing to maintain a tidy appearance.
What Draws Homeowners to Bigger Formats
Larger tile dimensions have steadily gained ground in residential design. Their appeal extends beyond simple novelty.
Surface continuity is the primary reason homeowners gravitate toward these products. Fewer grout lines produce a smoother expanse that reads as calm and intentional. The effect is especially striking in open floor plans where the floor carries the eye from room to room. Many people are surprised to discover that bigger tiles can make a modest room feel more generous in scale.
Maintenance is another practical advantage worth noting. Fewer joints mean fewer crevices where moisture, soap residue, or kitchen grime can settle. A single pass with a mop typically handles routine cleaning. Rectified-edge versions allow grout joints as narrow as 1/16 inch, shrinking the visible grout footprint even further.
The practical downsides deserve honest acknowledgment. A 24x24 porcelain tile carries substantially more weight than a 12x12 piece of the same material. Moving full boxes up a staircase or through a tight corridor requires strength and planning. One careless drop during handling typically ends with a shattered tile and an unplanned trip to replenish supplies.
Where Installation Gets Serious
The gap between these two categories widens dramatically once installation begins. Self-awareness and substrate honesty are your best allies here.
Subfloor flatness is the single biggest variable when working with bigger formats. Rigid tiles do not flex to accommodate dips or ridges in the underlying surface. When an oversized piece spans a low spot, one edge lifts above its neighbor — a condition known as lippage. Standard tiles handle the same imperfection gracefully by conforming to the floor's existing contour.
Achieving the flatness that larger formats require often involves grinding high points or pouring self-leveling underlayment across the entire area. Both procedures demand additional time, material, and careful measurement. Neglecting this prep work is the most common cause of visible, uneven results.
Setting technique changes as well. Back-buttering — scraping a thin mortar layer onto the tile's back face before placing it — shifts from optional to essential. A correctly sized trowel must achieve 80 to 95 percent contact coverage under every piece. Anything less leaves hollow voids that crack predictably under normal foot traffic.
Cutting thick, oversized porcelain also demands better equipment. A wet saw with a continuous rim diamond blade is the minimum viable tool. Snap cutters routinely crack dense porcelain rather than scoring it cleanly. When shopping for blades, the staff at a ceramic tile shop can point you toward models rated for your tile's thickness and hardness.
Looking Beyond the Sticker Price
The number printed on the box represents only the beginning of your actual expenditure.
Oversized formats cost more per square foot in raw material. The bigger financial impact, however, usually shows up in labor charges. Professional installers command higher rates because floor preparation and careful placement absorb more hours. The precision needed to prevent lippage across a large surface demands experienced hands.
DIY budgets feel the pinch in different ways. Renting or purchasing a wet saw capable of handling thick porcelain adds a significant line item. Breakage during the learning process is nearly guaranteed, making surplus material a smart purchase. Talking with a ceramic tile shop about waste allowances specific to your layout prevents mid-project shortages that stall progress.
Standard formats keep financial surprises to a minimum. Inexpensive tools, low waste rates, and a wide margin for error keep costs predictable from the first box to the final grout pass. For tight budgets, this reliability is a meaningful advantage.
Finding the Right Fit for Your Project
Three variables should drive the decision: the space itself, your budget ceiling, and your skill level.
Start by evaluating the room's shape and proportions. A generous living area, a spacious master bath, or a long hallway rewards the seamless surface that bigger tiles provide. Small bathrooms, galley kitchens, and rooms crowded with fixtures benefit from the adaptability of standard sizes. Matching tile scale to room scale produces the most satisfying and cohesive result.
Next, weigh who will handle the installation. First-time tilers develop faster when working with forgiving, manageable formats. A trip to your local ceramic tile shop with room dimensions and a few smartphone photos gives staff enough context to offer grounded material suggestions. When hiring a professional installer, let them assess the subfloor before you finalize a purchase.
Do not forget the structural dimension. Bigger tiles add meaningful dead load to any floor assembly. On upper stories, confirm that subfloor thickness and joist spacing can carry the added weight without deflection. A structural engineer can settle the question quickly if you have any doubt.
Reaching a Decision
There is no universal right answer to the tile-size question. Standard formats offer affordability, forgiving installation, and proven durability across a wide range of applications. Bigger options deliver a polished, contemporary surface with fewer joints to maintain — but they require a flat substrate and confident handling to succeed.
Rather than relying on how a tile looks mounted on a showroom wall, evaluate the full picture. Measure the room, examine the subfloor, and take an honest measure of your own experience. The best tile for your project is the one that matches the real conditions of your space.